 Sipdroid is an open-source SIP client that adds native SIP/VOIP to Android’s default dialer / contacts applications. You can find Sipdroid in the Android Market or alternatively can download it here. SIP (Session Initiation Protocol) is the Internet standard for real-time voice and video communications. It’s a fundamental building block for many popular consumer VOIP products that you may have used – Vonage or MagicJack are two examples. Once installed and configured properly, sipdroid allows you to make & receive calls over Wifi and 3G / EDGE data connections – which is a really powerful thing! A similar solution from Gizmo5 allowed many Android users to completely untangle themselves from mobile minutes and rely on a purely VOIP solution. Alas, new Gizmo signups were suspended after Google announced their acquisition – but we should all be excited to see what they can cook up as part of the official Google Voice team.
While it’s expected that SIP providers will become more interoperable, the simplest and most powerful solution currently available to get sipdroid running involves registering to the virtual PBX service from PBXes.com. For the uninitiated, a PBX (Private Branch Exchange) is what establishes and manages the connections between the telephony products of a private organization (telephones, fax machines, etc.) – each of which is labeled with an ‘extension’. It also is the system through which these extensions are able to access the public telephone network (PSTN). Since the 1990s, traditional PBX solutions – usually out of reach for small businesses or individuals due to cost and complexity – have evolved to IP-based and virtual or hosted PBXes, which greatly simplify the processes of building and scaling telephony services. PBXes.com is one such ‘virtual PBX.’ Once a PBXes account is established, the account owner can create multiple extensions beneath it and easily dial between those extensions. You get 5 extensions for a free account, more for paid account types.
Why is this solution so interesting? If you have a relatively small group of colleagues (NGO, humanitarian workers, activists, journalists, etc.), it allows you to easily establish a private internal phone system that can be used over a data connection in lieu of the regular phone system. In our experience, the call quality is also quite good. And while the following step-by-step guide will lead you through the process of setting up this simple solution, first a word of caution: this is not a secure solution yet. It is a first step, however, down that road. To achieve a more secure solution, we need to enable more features, include tunneling and encrypting traffic through a Virtual Private Network (VPN) as well as integrating to a privately maintained Asterisk phone server running with custom security settings.
We are also investigating solutions that uses a public key exchange model, such as Philip Zimmermann’s ZFone, such as the new RedPhone app just announced by WhisperSystems.
1. Configure extensions to a PBXes.com account
If you don’t already have a PBXes.com account, head over to http://www.pbxes.com and fill out the straightforward account registration form for a free account.
Next, select ‘Extensions’ from the left-hand navigation menu, then choose ‘SIP’ under ‘Add an Extension.’
Last, configure your new extension with a few critical elements. Make sure you fill out the following fields, at a minimum:
-
- Extension number (e.g. 100, 101, 402, etc.)
- Display name (e.g. johndoe-100)
- Password
After clicking ‘Submit,’ go ahead and repeat the process for as many extensions as you’d like to set up. Each of these will be specific for a unique Android device. Don’t forget to APPLY your changes when finished by clicking the bright red bar – this ensures your changes take effect.
2. Configure extensions on sipdroid
If you don’t already have sipdroid, you can find the latest version here, or point your barcode scanner to the following QR code:
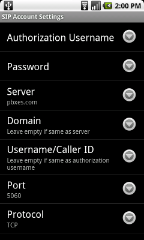
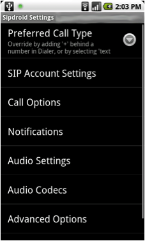
Within the Account Settings section of sipdroid, set up one of your extensions from step 1:
· Authorization Username and Password
· Server: pbxes.com
· Port: 5060
· Protocol: TCP
You should see a green dot appear in your notifications tray on successful registration like so:
3. Trial Run – dial between extensions
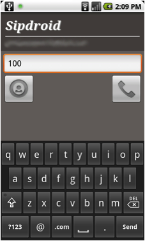
Once you’ve set up a number of extensions within your PBX, you can easily dial between them. Simply input their extension number (e.g. 100).
4. (Optional) Configure VPN
As mentioned above, the solution so far isn’t a secure one. A first step in the right direction is connecting to PBXes’ PPTP VPN. For those quicker on their feet, configuration instructions can be found here. If you’d prefer to stick with us, follow these steps:
4a. On your Android phone, access the ‘VPN settings’ section of Wireless & network settings.
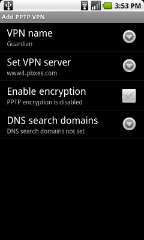
4b. Select ‘Add VPN,’ then ‘Add PPTP VPN’

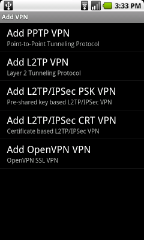
4c. On your Android phone, access the ‘VPN settings’ section of Wireless & network settings.
- VPN Name – your choice
- VPN server – www#.pbxes.com [for # see URL line after logging into PBXes on your browser]
- Enable encryption – We haven’t had success with enabling encryption on PBXes yet. This might be due to a sipdroid issue or it might not. If you have success on Android 2.0 / Éclair please let us know in the comments! Nathan reported issues with encryption using PBXes PPTP VPN as well. -Derek Halliday 5/12/10 4:33 PM
- DNS search domain – leave empty
-
Username –
- (e.g. guardianproj-401) -
Password –
That’s it! If you come across any issues or have any questions along the way, please let us know in the “Comments” below and we’ll do our best to help you out or clarify. And if you’re itching for more, here are a couple next steps. We’re not presenting a deep tutorial on these (yet), so we’d love to hear from you if you have pursued either – or even better – if you’ve used sipdroid and/or PBXes in any other creative ways!
- Hook your PBXes account into an external DID / VOIP number to dial out to standard phone. Think of it as the equivalent of ‘Skype Out’ for sipdroid. You can use a service such as CallCentric (http://www.callcentric.com/) for this.
- You can also integrate desktop VOIP programs or other mobile device client into the same PBXes accounts. Here’s a great list of free, open-source SIP clients. We personally like Blink for Mac OS.
- If you have a privately maintained Asterisk or other SIP compatible-server, you can use this same approach with that box, and integrate with your own VPN server. We will be covering this in more detail with a future post, as this is a more secure solution that using a provide such as PBXes.


